Replace your default terminal with iTerm 2
iTerm 2 is a replacement application for the default terminal on OSX. It’s highly popular due to allowing advanced features such as tabs, split panes, simpler theming and custom keyboard bindings. If you are Mac User but not yet benefit from this, you better give it a trial. You can download this tool from here. After you install it, you can follow the example below and taste the power of it.
Examples of Usage
Split Panels
- Split vertically: Command+d
- Split horizontally: Command+D

The inactive panel will be dimmed out.
Simultaneous command on all panels
Toggle with: Command+Shift+I
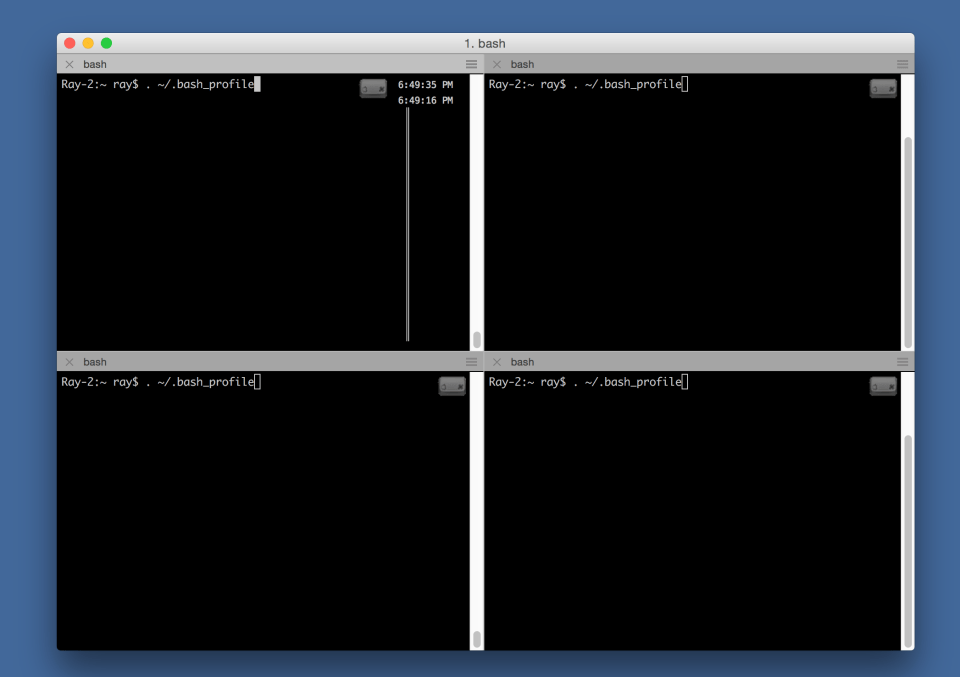
You can use this feature to:
- issue simultaneous requests to a server
- have all panels source the ~/.bash_profile together
- use your imagination…
Cursor Move
|
1 2 3 4 5 6 7 8 9 10 |
Ctrl + b # Move back one character Ctrl + f # Move forward one character Ctrl + d # Delete current character Backspace # Delete previous character Ctrl + - # Undo Ctrl + a # Move to start of the line Ctrl + e # Move to end of the line Option + > # Move forward a word * Option + < # Move backward a word * |
The Option movement I have customized it on my Mac. You can do the same via following this tutorial
Cut and Paste
|
1 2 3 |
Ctrl + k # cut from the cursor to the end of the line Ctrl + w # cut the cursor to the previous whitespace |
Mac Useful shortcuts
|
1 2 3 4 5 6 7 8 |
cmd + tab # Move focus to next application cmd + ` # Move focus to next window ctrl + tab # Move focus to next tab cmd + w # Close tab cmd + q # Close application F3 # Show workspace Ctrl + R # Reverse-i-search |
Improve the Finder
The default finder are missing some key features like:
- open tab like chrome
- create new file
- hide and show hidden files
- cut functionality (with the standard Cmd + X shortcut)
- arranging folders on top
You can resolve these thru xtraFinder app that you can download it from here. After that, you can use its preference setting to create a set of shortcuts for your these tasks.

NOTE: You may come across issues related to system integration protection that prevents XltraFinder working. You can get around it without disable the protection. Follow the steps below to resolve it.
- Reboot OS X
- Before OS X starts up, hold down Command-R and keep it held down until you see an Apple icon and a progress bar.
- After you get to the recovery screen, find Utilities from the menu bar.
- Select Terminal and type “csrtutil enable –without debug” and hit enter. Terminal should display a message that SIP was disabled.
- From the menu, select Restart. Then you are good to go.
Screenshot and Screencasting
|
1 2 3 4 5 6 |
cmd + shift + 3 # Saves whole screen cmd + shift + 4 # Saves user selected part of the screen Open QuickTime Player > File > New screen recording # screencasting |


Connect with us